News flash: Excel is not just an excellent spreadsheet program used in offices across the world. Excel holds social status. It comes with bragging rights, memes, and infinite possibilities. The cells can imprison you inside their endlessness or set you free into a pasture of unimaginably large opportunity.
It can be tempting to look at the terrifying power in front of you and say, “I’m just super bad at Excel — I don’t get any of it, you know?” Nonsense! Anyone can improve their Excel skills, and no one is born with them. To start your journey in Excel or to take a brief moment to celebrate how much you already know, read on for ten beginner Excel tips.
1. Drag and Drop: To begin our journey to Excel expertise, we will start with the simple Drag and Drop. Taking one cell or a selection of cells and dragging it to another area of the spreadsheet with the mouse seems like an impossible task at first. Trying to drag that selection to another area simply results in the first selection being forgotten about and a new selection taking its place. To get around this, click and hold on the border of the cell or selection, and drag and drop it to wherever you wish.
2. TRIM Function: Often, when entering a lot of data in one sitting, there is bound to be an error somewhere. Whether it’s a misspelling, an extra space, or a wrongly capitalized word, many errors can cause worse problems later if they are not caught and corrected.

To catch errors that have to do with spaces where they should not be, use the TRIM() function. To use it, click inside a cell and type an “=” sign, followed by the name of the function you would like to use – in this case, TRIM. Next, hit the “TAB” key, and select the cell(s) that you would like your function to reference.
Here, we will be referencing a cell that may or may not contain an extra space where one does not belong. Once that cell is selected, simply press enter, and Excel will do the rest of the work for you, removing all instances of unneeded spaces in the cell.
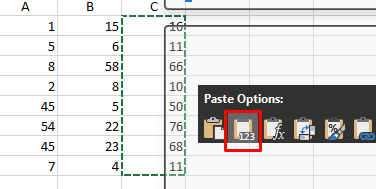
3. Copying & Pasting Static and Dynamic Cells: Our next Excel tip is a simple copy and paste, but with a focus on understanding. Excel formulas are incredibly helpful, but unless you take the right action, they will output dynamic values. In other words, formula cells are constantly considering their surroundings and may change if the data around them changes. This is because the actual value of the formula cell is its calculation, not the answer to its calculation.
If you want to have the cell contain the static answer to a formula, simply copy the formula cell, right-click on the formula cell, and paste the values. This will overwrite the formula and create a new stagnant cell that has a static value. Understanding the difference between static and dynamic cells is a huge step toward feeling more in control of your data.
4. Split Cells Using Delimiter: It’s time for magic! To split one cell into two separate cells, use the Text to Columns tool under the Data tab. A character, called a delimiter, must be selected to initiate the split in each cell.
For example, if you want to split a cell with someone’s full name into two separate cells for first name and last name, the delimiter would be the space between the first and last name in the cell.
After using the tool, the delimiter will be deleted, and the cells will become separated. This can be done to an entire column if needed, as long as the delimiter is the same.
Before:
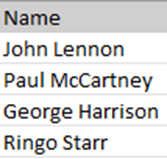
After:

5. Merge Cells Using CONCATENATE Function: The magic’s not over! To merge two separate cells together, we’ll use concatenation. Concatenation is essentially the opposite of the Text to Columns tool.
Here, use the function “CONCATENATE()” inside a cell, making sure to reference two or more other cells inside the parentheses. Doing so should look something like this:
“=CONCATENATE(text1, text2)”
Doing this will simply combine the two cells into one, but oftentimes you will still want a space or character separating the two texts. To do this, make sure to list the linking character you would like in between the first and second text, surrounded by quote marks, like so:
“=CONCATENATE(text1, “ “, text2)”
Before:

After:

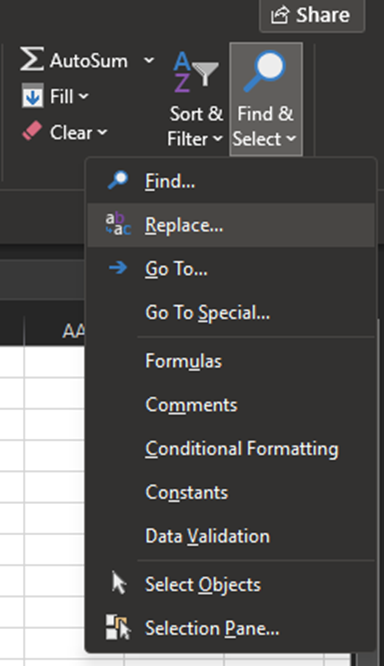
6. Find and Replace: Excelling at Excel means being able to make huge changes to your spreadsheets with little effort. With that philosophy, it is imperative to make use of the Find and Replace tool.
To use this tool, click the Find & Select button under the Home tab, and select Replace from the drop-down menu. From here, you can use the machine’s abilities to search for things all at once inside your spreadsheet. Under the “Find what:” selection, choose the string that you would like to search for. Under the “Replace with:” section, type anything you would like to put in its place.
As a helpful tip, you can always decide not to enter anything under the “Replace with:” section, and your machine will simply delete all instances of your “Find what:” section and replace it with nothing.
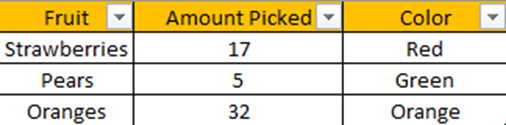
7. Use Filters to Sort Columns: Along with being able to make considerable changes with little effort, it is just as necessary to analyze and understand huge amounts of data with little effort. The first step to this end is making use of filters. Filters allow you to sort and filter your tables without compromising the order of their contents.
For example, in the figure below, one could sort the fruit by the amount picked, highest to lowest, and Excel will automatically move the corresponding Color and Fruit columns as it sorts the Amount Picked.
8. Freeze Frames: Using filters saves a ton of time in reading large amounts of data. If the data is too large, though, constantly scrolling can be tiresome, and it wastes time. By using the option to Freeze Frames, you can keep your column headings, and filter drop-down menus close at all times.
The easiest way to use this option is to select Freeze Panes from the View tab and select Freeze Top Row from the drop-down menu. As long as your column headings are on the top row of your spreadsheet, this will make your headings stay in the same place on your screen whether you scroll up or down. Feel free to experiment for more customizable freezing options.
9. Use Keyboard Functionality: The longer you work in Excel, the more you realize just how great the keyboard is. Moving to the mouse becomes a chore, and the more you can stay on the keyboard for your tasks, the faster you will become.
Using CTRL + an Arrow Key (or Command + an Arrow Key on a Mac) will instantly take you to the end of your data. For example, if your table has eight columns and 77 rows, pressing CTRL + Right Arrow Key will take you to the eighth column, and pressing CTRL + Down Arrow Key will take you to the 77th row of data. This key combination can be used while holding the shift key to manipulate selections as well.
10. Autofill: Lastly, don’t forget about Autofill — Excel’s way of using its artificial intelligence to populate a column. To use this, click on the bottom right corner of a cell and drag the mouse downward. This should have Excel either copy the cells downward or follow a pattern of change downward.
For example, if the column is a date, and every row is a new day, Excel will be able to pick up the pattern of change and continue it without missing a beat.
If the program ever assumes something you don’t want it to, click on the green box at the bottom right of the selection to change the autofill options. In many cases, double-clicking on the bottom right of the cell will have the same effect as the drag and drop as well.
Bonus tip: Sometimes clicking and dragging to copy is, well, a drag. But, you can fill down from a cell. Select the cell that has the data you want to be copied down, then select the rest of the rows you want the data in, and hit Ctrl+D on a PC and ⌃+D on a Mac.
Hopefully, these ten (eleven) tips will make learning Excel a bit easier, but they are just the beginning. Once you’ve gotten a taste of these tools, it is best to experiment with them and discover new ways that Excel can help you.
If you want to master more than just excel, we have additional JumpFly tips in our post, 8 Advanced Operators To Search Like A Rockstar.