Have you ever found yourself endlessly scrolling through short, attention-grabbing videos on Instagram or Facebook? That’s the power of Reels – Meta’s answer to TikTok and a major driver of user engagement. And for advertisers, that means one thing: opportunity.
In this guide, I’ll walk you through what Reels are, how to make scroll-stopping creative, and how to launch a Reels/Stories campaign that converts.
Although a lot of these Reels contain funny videos, recipe hacks, or catchy dances, there is an opportunity for advertisers to push their way in and cut through the noise to promote their product or service. Since Reels are so widely consumed, advertisers should tailor their content to this format to maximize reach and conversions. According to one of Meta’s latest earnings calls, Instagram users spend 50% of their time on the app watching Reels. And there are two billion monthly active users worldwide in 2025 using Instagram (Demand Sage). That’s a TON! Just imagine the reach your ads could get.
In this beginner’s guide, I will take you through exactly what Reels are, how to create an outstanding Reel that wins in the auction, how to be savvy with the content you use on Reels, ways that you can leverage this type of content in your ad strategy, and much more.

Get For-Reel.
Alright, it’s time to get for-reel. For anyone who has no idea what a Reel is, “Reels are short videos you can easily create and enjoy watching on Instagram” (Meta). You can create multi-clip videos up to three minutes, and get creative with easy-to-use text, AR filters, and audio, and you can upload videos from your gallery too.
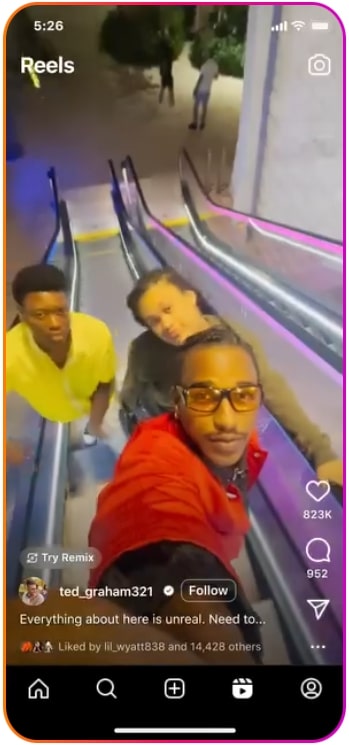
Reels appear in the Reels placements across Instagram and Facebook and can show up as a post in your feed, too. See the screenshot below for how a Reel appears in its placement on Instagram!
Why Should I Prioritize Reels?
As mentioned at the beginning of this blog, Reels are where users’ eyeballs are. Since people are finding themselves endlessly scrolling in this area, you, as an advertiser, have a huge opportunity to tailor your content to that placement, and when done correctly, get them to convert.
While it’s important to capture attention within the first three seconds of your Reel, you also should be thinking about how to make that content feel native. If your content looks like an ad, meaning it is pushing a hard sell right away, users might be inclined to scroll right past. Instead, the content that works well here is content that blends in.
I always say this to my clients, but social media is a space where users are going to for entertainment purposes, to connect with friends and family, learn something, and to consume content. They are not necessarily opening their Instagram app, heading to the Reels section, and making a purchase. I can guarantee that they are going there for a good laugh or to learn something new that they have an affinity with.
UGC For Reels (AKA Your Secret Weapon)
One of the best ways to show up authentically in Reels is by using user-generated content (UGC). This is content created by real people, usually customers, that shows your product in use in a natural, relatable way. Not only does UGC blend in perfectly with organic Reels, but it also builds trust with new audiences.
You can find UGC by checking your brand’s tagged posts on Instagram or Facebook, or doing some social sleuthing by searching your brand name across platforms. If you spot something great, don’t forget to:
- Ask the creator for permission to use their content
- Clearly outline how and where the content will be used
- Mention any branding guidelines or design tweaks
- Handle legalities (contracts, usage dates) if necessary
Once you’ve got the green light, a little polish can go a long way. Drop in your brand name or logo, add a 5-star graphic ⭐⭐⭐⭐⭐ to build credibility, or use text overlays to highlight key benefits. Tools like Canva or Adobe Express make this process simple, even if you’re not a designer.
Create Your Own Scroll-Stopping Reels
If you don’t have UGC – or want to mix in more branded content – that’s totally doable. Reels are a great format for short, punchy, and engaging product or service highlights. Here’s how to keep it fresh:
- Keep it vertical (9:16) and ideally under 15 seconds
- Lead with a hook in the first three seconds – make people stop scrolling
- Use text overlays to call out benefits or features
- Add trendy music or native sounds to blend in with organic Reels
- Think native > polished. Reels work best when they feel real, not overly produced
Remember: users are on Instagram to be entertained, not sold to. So the more your content aligns with what they’re already consuming, the better your chances of earning a watch, or even a conversion.
💡 Pro Tip:
Are you already creating TikToks? Perfect – you’re halfway there! A lot of your TikTok content can be repurposed for Reels with minimal adjustments needed. Since both of these platforms favor short-form, vertical videos, it’s often just a matter of tweaking a few things:
- Remove the TikTok watermark, as Meta will most likely deprioritize videos that include this
- Update any captions or CTAs to align with your Facebook/Instagram audience
- Swap out music if it’s platform-specific or doesn’t carry over due to licensing issues
Repurposing your content helps you maintain consistency without doubling your workload, and it’s a great way to maximize the value of your content.
Implementing It All
Are you ready to try out a Reels/Stories-only campaign yet? If so, it’s very easy to do! In Ads Manager, when you are setting up a campaign, there is a section called Placements. A lot of advertisers will opt into “Advantage+ Placements,” which is all of the placements across Meta, from feeds, audience network, marketplace, and so much more. Your campaign setup will automatically have all placements selected, so you will need to do some manual work to only have these ads shown in Stories/Reels placements.
It only takes a few clicks, and you’re good to go. At the ad set level, you will find a section that looks similar to the one below:

You’ll notice at the top right corner, in green, that Advantage+ is automatically on. This is what we will want to change. Select “Show more settings” in the bottom left corner.
Once you have clicked on “Show more settings,” you’ll see a few options appear, and it should look like this:

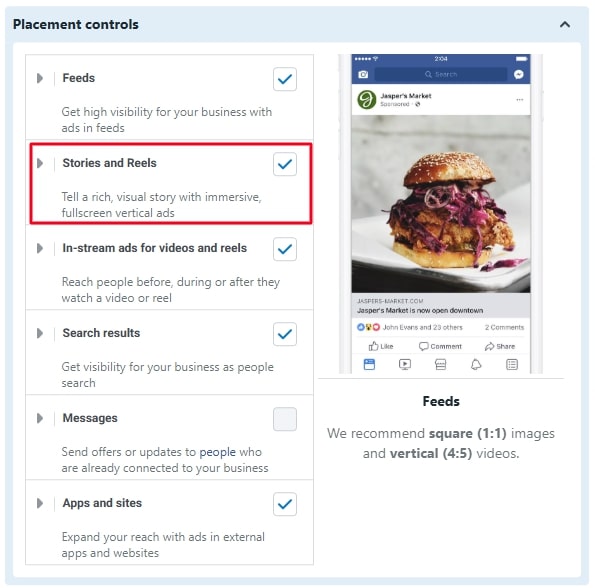
Next, you’ll want to hover over the “Placement controls” section until you see a pencil appear to the right.

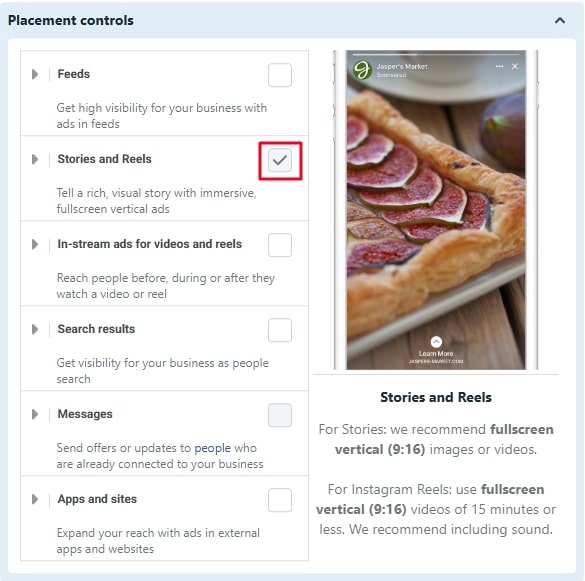
What you’ll see are umbrellas of different placements across Meta, and when expanded on, you see the more granular specific placements that are selected. In our case, we would want to uncheck everything except for the placements that live in the Stories/Reels section.
You’ll notice that Stories/Reels is the only section that is checked. This is how we want it to appear.
And voila! You have created your first Reels/Stories campaign. Once your campaign is running, track performance in Ads Manager by looking at metrics like video plays, engagement rate, cost per result, and ROAS. Be sure to compare Reels’ placement performance to other placements to evaluate its impact.
Reels are one of Meta’s most dynamic placements, and they’re not going away anytime soon. If you haven’t started testing Reels in your campaigns yet, now’s the time to start experimenting. Remember, it’s not about perfection; it’s about being engaging, relevant, and real.
Ready to get for-reel?