Uploading your product catalog to Google Merchant Center enables you to use it with Google Shopping ads and other Google services, as well as Microsoft Shopping ads, making your products available to more than 95% of shoppers using a search engine.
Use this guide to work your way through the less-than-intuitive set up process for Google Merchant Center.
Create an Account
First, create a Google Merchant Center account to upload your feed, and link it to your Google Ads account.

- Create an account. Click “Sign In” then “Sign in to Merchant Center.”
- Enter your email address and other information to sign up.
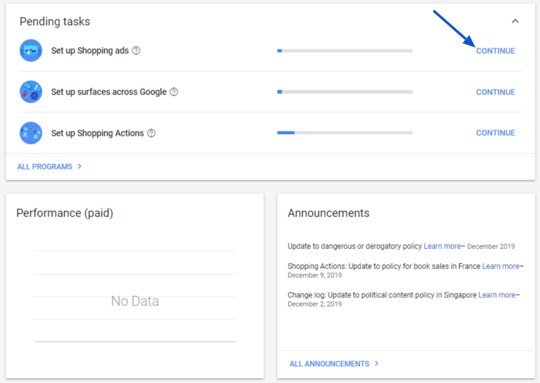
- When you see the screen below, select “Set up Shopping ads” under “Pending Tasks.”
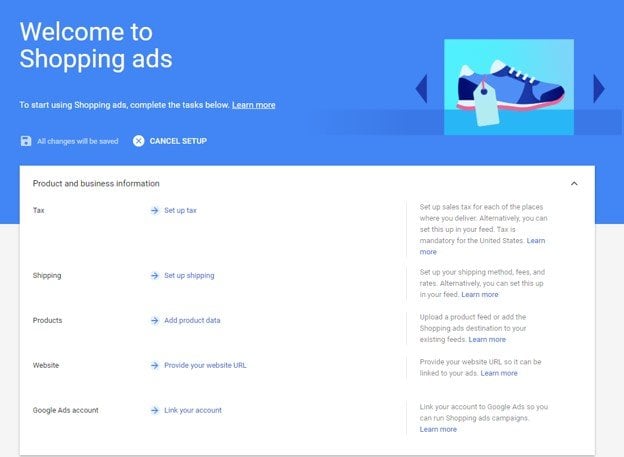
Now that your account is created, you will have to complete tax, shipping, and other tasks to get your Merchant Center account set up and linked to your Google Ads account.
There is a nice and easy checklist – shown below – to go through before launching your shopping campaigns to ensure that the ads will be shown and your product listings comply with Googles compliances.
Set up Sales Tax

Set up sales tax for all of the
places you sell products to. Tax is mandatory for the United States. There are
three tax options described below, but the third is the most commonly used.
- Don’t configure tax at account level: Tax setting adjustments for your account must be made through an aggregator account or in your product data.
- Configure no nexus for all states: You’ve indicated that you don’t have tax nexus in the United States. Your products won’t show sales tax anywhere in the US.
- Configure tax and set up nexus: This option is most often used. In order to accurately calculate the sales tax for your products on Google Shopping, you must configure the states, counties, and cities in which you collect sales tax. You can choose to let Google set the tax rate automatically based on the destination address or manually enter the tax. We recommend using the automatic setting, as tax rates change continually. You’re less likely to have tax-related issues if you let Google Ads handle the updates.
After selecting a tax option that fits your business, click “Back to Shopping ads setup” to continue.
Set Up Shipping
Set up your shipping method, fees, and rates. Although you can set this in your Shopping feed using the shipping column, it’s easier to do it now in the Merchant Center set up process.
- Under the “Shipping Services” tab, hit the + button to add a shipping service.
- Fill out the necessary information in the form, such as free shipping for all products with no minimum order value required.
- At the bottom of the page, click the + button under the “Shipping Rates” section to add your company’s shipping rates.
- Enter your shipping rate information and click continue. Then save the shipping service on the next page. Note: Using the option “No Shipping” doesn’t mean free shipping, it means you do not ship to that location.
- If you deliver to only specific areas, choose the “Shipping Delivery Zones” tab and click the + button to create your delivery zones.
- If you allow returns, complete the next tab as well.
- When finished, return to the Shopping ads set up page.
Verify and Claim URL
You must provide your website URL so it can be linked to your shopping ads. This is a requirement to be approved to show your shopping ads on Google. This is the last setting that needs to be made to set up your Google Merchant Center account for shopping ads. It will be labeled “Website” and you will click on “Verify and claim your website URL.”
- Type in your website’s URL – starting with http:// or https:// – and hit “Save.”
- You will be presented with three options:
- I have a Google Analytics account: You can use your existing Google Analytics account to verify your URL, but only if you use the asynchronous tracking code and you have “edit” permission for the Analytics web property. The Google Analytics tracking code is used only to verify site ownership. No Google Analytics data will be accessed. To use this method:
- Click “Verify URL” to submit your URL to Google Search Console for verification and claim it.
- Once you submit your URL, you’ll be sent a confirmation email from Google Search Console.
- I have the Tag Manager container: You can let Google Tag Manager connect your URL to your account. Make sure you use the container snippet and have “admin” permission for the Tag Manager container. The Google Tag Manager container ID is used only to verify site ownership. No Google Tag Manager data will be accessed. To use this method:
- Click “Verify URL” to submit your URL to Google Search Console for verification and claim it.
- Once you submit your URL, you’ll be sent a confirmation email from Google Search Console.
- I have access to my server: You can add the HTML or upload a HTML file to your website to verify. There are two option for doing this step.
- Add an HTML tag to your homepage: To use this method, you’ll need to add a meta tag to your site’s home page.
- Copy the custom meta tag shown in the interface and paste it into your site’s home page. It should go in the <head> section, before the first <body> section.
- Click “Verify URL” to submit your URL to Google Search Console for verification and claim it.
- Once you submit your URL, you’ll be sent a confirmation email from Google Search Console. To stay verified, don’t remove the meta tag, even after your URL is verified.
- Upload a HTML file to my website: To use this method, you must be able to upload new files to your server.
- Click the link to download the custom HTML file.
- Upload the file to the root directory of your website.
- Confirm the upload by visiting the URL for the uploaded file.
- Click “Verify URL” to submit your URL to Google Search Console for verification and claim it.
- Once you submit your URL, you’ll be sent a confirmation email from Google Search Console. To stay verified, don’t remove the HTML file, even after your URL is verified.
- Add an HTML tag to your homepage: To use this method, you’ll need to add a meta tag to your site’s home page.
- I have a Google Analytics account: You can use your existing Google Analytics account to verify your URL, but only if you use the asynchronous tracking code and you have “edit” permission for the Analytics web property. The Google Analytics tracking code is used only to verify site ownership. No Google Analytics data will be accessed. To use this method:
- Optionally, you can click the “Branding” tab to upload your logo and brand colors for use in Smart Shopping campaigns on Google Ads.
Link Ads Account
Lastly, you will need to link your new Google Merchant Center account to Google Ads. You can either create a new Google Ads account or link an existing account.
- Click “Link Account.”
- Insert your Google Ads Customer ID (CID), a 10-digit code in this format XXX-XXX-XXXX.
- Send the link request to prompt a notification in your Google Ads account asking to link with your new Google Merchant Center account.
- If you have access to your Google Ads account, log in to Google Ads and accept the link. Otherwise, it’s a good idea to contact whomever does and let them know that the request was sent.
Activate Your Account
Once you have finished with the set up, you must return to the Shopping Ads set up screen to check the box indicating that you read the review polices. Once you do that, Google Merchant Center account will finally be active, and you’ll ready to submit your product feed for Google Shopping ads.