The Google Ads Asset Library is a newer tool from Google that really helps advertisers be more efficient. The Asset Library allows you to access your assets – like images, logos, and videos – in one place, making campaign creation faster and collaboration between graphic designers and ads managers more streamlined.
There are multiple benefits of the Google Ads Asset Library, with the first one being able to have access to your images, logos, and videos all in one place. Other benefits include:
- Reuse your assets without having to upload them each time you create a new ad. This can be very useful when it comes to building current and future campaigns for your clients.
- Search and filter by the asset’s name, type, and content.
- Arrange your assets in folders and sub-folders to keep them organized. For example, if you have images from a client for a specific sub-category of products – like Men’s Sneakers, you can create a Men’s Sneakers folder for those assets. (Important Note: at this time, you can’t move images already in the Asset Library into a newly created folder. You can only create the folder first and then upload images to it. Hopefully, Google will allow you to reorganize images into folders after upload in the near future.)
- Allow other team members, like graphic designers, the ability to load and manage images, allowing for faster ad creation and making sure the right images are used.
All of the materials you’ll need to construct an advertisement for your non-text-based ads are stored in the Asset Library, which functions as a gallery. You can even remove images that are no longer needed, like if an item is discontinued or the packaging has changed. This will prevent you from using incorrect images.
And another great new benefit of the Asset Library is that Google released the Video Builder tool from Beta and integrated it into the Asset Library. Now you are able to create 6-, 15- and 16-second videos from your still images, logos, and text. Then add music, and upload them to your YouTube channel. You can also trim an existing video to a 6-second length, and you can add a voice-over.

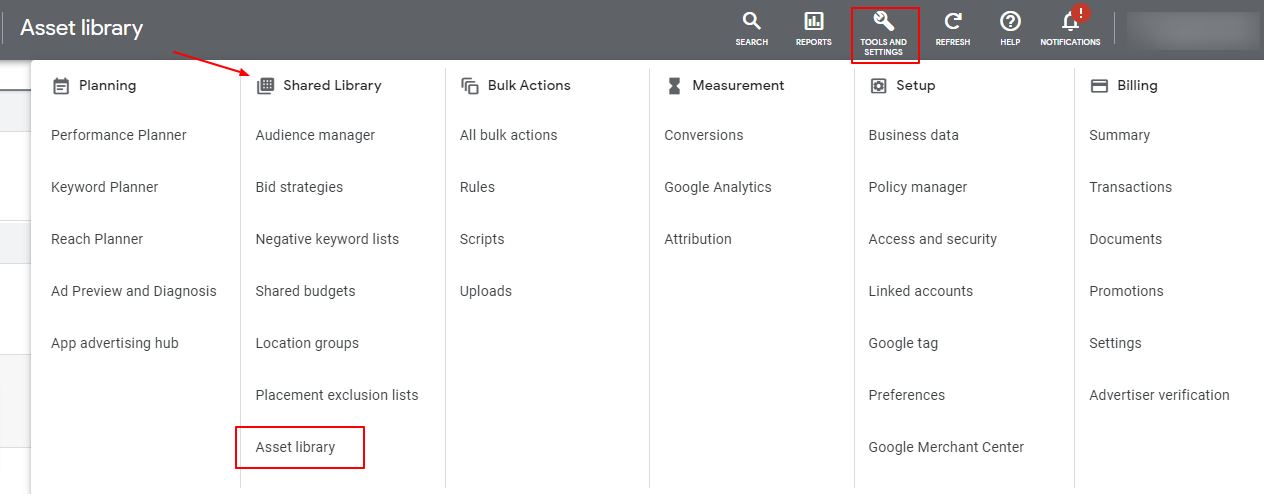
To access the Asset Library, go to the TOOLS AND SETTINGS icon in the upper-right navigation menu. You’ll find the Asset Library under the Shared Library column.
You can view the assets in your library either as cards or a table. You can also search by name (make sure the names make sense before you upload them, as you can’t rename them once loaded to the Asset Library at this time), asset type, width, height, file size, and more.
There are two ways to add images and videos to your Asset Library:
- Automatically: Images and videos will be added automatically to the library each time you upload a new image or video during ad creation.
- Manually: Once in the Asset Library, click the blue PLUS button in the upper left. You can upload a file, a video link from YouTube, or even upload a folder. This is also where you would create a new folder and then upload the images to it to keep them organized.
To remove assets from the Asset Library:
- Click the check box in the upper left of each image you want to remove.
- Click the Remove button in the upper left.
The Google Ads Asset Library is a very important tool that allows you to access all of your assets in one place, making ad creation faster and easier for everyone.