As a digital marketing agency, one of the biggest pain points we encounter with our clients is how to navigate the Ads Manager interface. More specifically, clients are mostly concerned with the performance of their campaigns, audiences, and ads. Advertisers are often unaware that there is an amazing and efficient tool that allows you to gauge performance quickly: Meta’s Columns in Ads Manager.
Why Should You Care About Columns in the Interface?
If you’re starting to read this and thinking, why should I care about this? Well, the reason is simply put by Meta itself:
“By customizing columns in Meta Ads Manager, you can view specific data and learn if your campaigns are helping you meet your business goals. For example, if you want more people to view your video ad, you can customize the columns to show how many people watched your video.”
Meta Business Help Center
The social platform’s interface can be daunting to many due to the vast array of buttons and settings available to you. This blog will provide you with a guide to making the most out of Meta’s columns.

First Things First: How To Locate Columns in Ads Manager
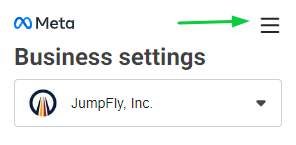
If you’re a new advertiser to the Meta platform, chances are you might feel a bit overwhelmed locating where functions are in the interface. The first step is to open Ads Manager, which can be found in the hamburger menu in your Business Settings (see the image below with a green arrow pointing to the hamburger menu).
Once you have opened this menu, look for Ads Manager. You will see a list of tools available to you grouped in sections. My Ads Manager is in my Shortcuts because I utilize it the most out of every other tool. Please keep in mind that your Ads Manager may be below the Shortcuts section, and you may need to scroll to locate it. See the image below to locate Ads Manager.
Once your Ads Manager has loaded, you should see your ad account pop up. Finally, we can find where the columns are located! Within the interface, at the very top right, you will see some buttons. Below those buttons is where you can locate your columns. Please reference the image below, where I have outlined in green where your columns live in the interface.

Congratulations – you have successfully found your columns!
The Wonders of Meta’s Columns
Now that you have located your columns, it’s time to start learning the wonders that they can do for your business. You’ll notice that when you click on the columns button, a dropdown menu will appear. This is what it looks like (see the image below):
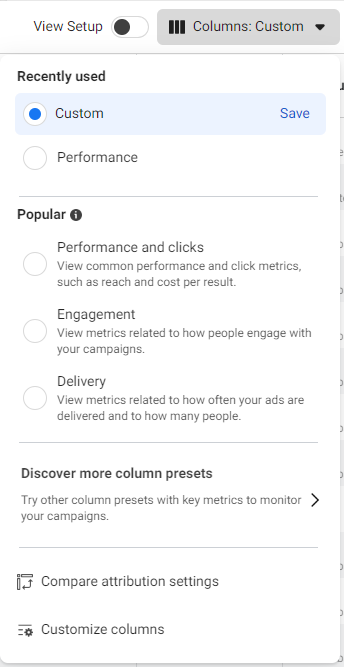
Please be aware that Meta updates its interface frequently, so depending on when you are reading this, your columns dropdown menu might look different from this one. The interface already has two sets of column views for different purposes. However, I believe that it is way more beneficial to customize your columns, which you will notice an option for at the bottom of that dropdown menu (see the image above).
Since every advertiser is unique, there will be different metrics that are important to one advertiser versus another. Also, depending on one advertiser’s campaign structure, that advertiser should consider creating different customized columns for each campaign since they would be tracking different metrics.
For example, if you are running a lead generation campaign and a conversions (sales) campaign at the same time, you will want to have two column presets dedicated to each ad campaign. The thing that I love is that you can name these customized column presets anything you want. I suggest naming them something that will be easily digestible and understandable for quick access.
More on Customized Columns
Once you click that button to customize your columns, you’ll notice there are many different metrics listed. On the left side of the customize columns window, Meta places certain metrics in specific areas depending on their category. The four categories of metrics in this menu are Performance, Engagement, Conversions, and Settings. See the image below, where the green outlined boxes show the four metric categories.
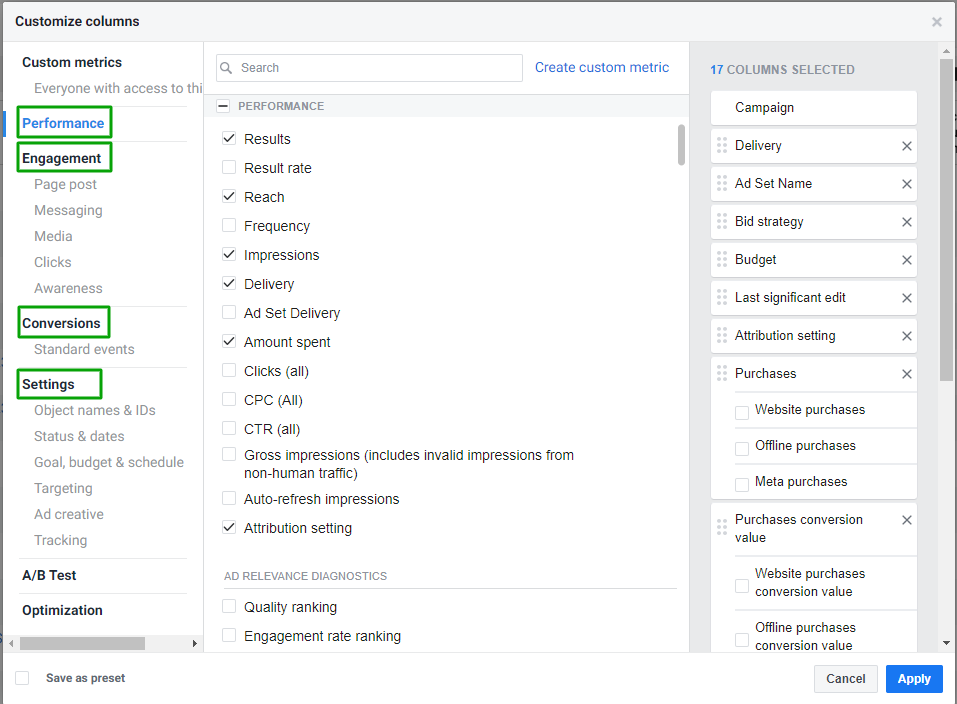
Still, on the left side, the Meta interface takes it even further by breaking down sub-categories. For example, under Engagement, you can click on Page post, which will then present you with the metrics related to page posts in the middle section of the window. This is a super quick and easy way to start building your customized columns to include metrics that you would like to see.
If you can’t seem to find a metric that you are looking for, you can create a custom metric! This option can be found in the middle of the window, directly to the right of the search bar, which is located at the top middle of the image.
So, what’s the right side of the window do? Well, that is where the metrics that you choose (by checking the checkbox in the middle part of the window) live. Over on this right side, you can drag the metrics to order them how you want them to appear. Whatever metric is at the top of the right side will be the first column (from left to right) that you see when you view your columns in the interface, outside of this window.
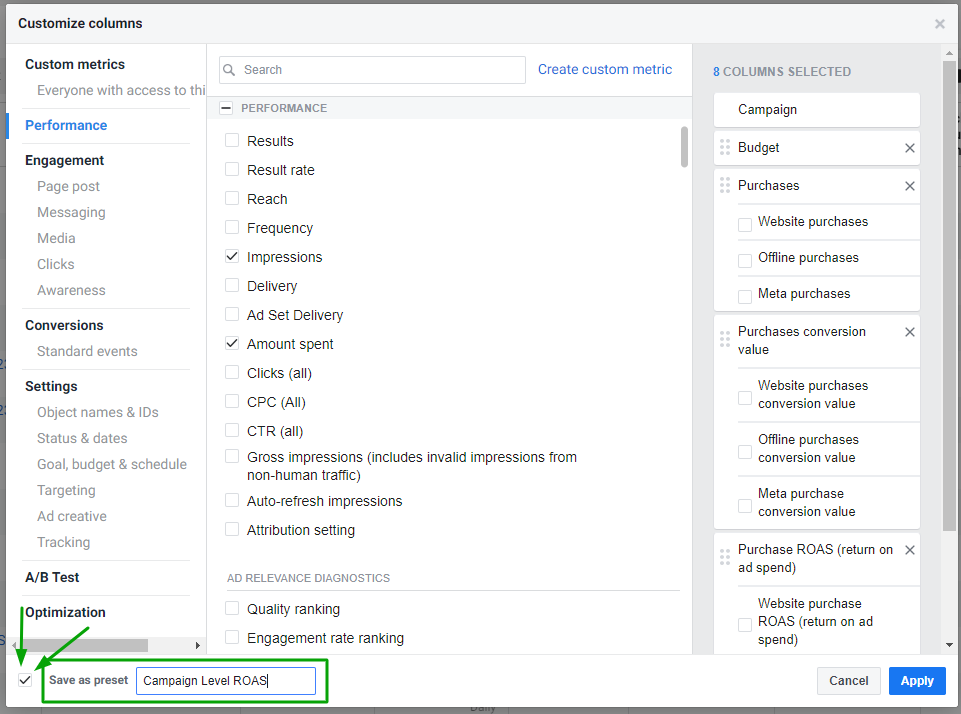
Now that you have chosen your metrics and have organized them in the order that you would like them to appear, it’s time to save the column as a preset. This is the most important part because it is an easy step to forget about. To do this, hover to the very bottom left of the window, and you will find a box with the words “Save as preset” directly to the right of it. Check the box, and a blank pane will appear where you can then name your column preset. See the image below for reference.
As I mentioned earlier, depending on what you are optimizing for, or trying to uncover about your ad account’s performance, your column preset should reflect that in your own unique way. I chose preset names that I personally know will resonate with me and will be easily accessible when I am trying to look at one thing compared to another. To locate your saved preset later, you can find it in the dropdown menu of the columns button.
Final Remarks on Meta Interface Columns
What’s super cool about these columns and the customization of them is that you can customize them for everything. As you can see in the image above, I chose metrics that I would want to look at to gauge performance for my client’s overall return on ad spend (ROAS). I would strictly use this preset when I am looking at the performance at a campaign level (hence why I notated with Campaign Level ROAS).
However, I can create a ROAS for ad sets (or my audiences) and my ads! I can also include metrics that are more relevant to the ad level, such as the number of post comments or post shares from an ad that I may be running for an engagement-objective campaign. There is so much customizing you can do with Meta columns, so I encourage you to play around with the different metrics, and create presets that work best for you!
Since columns in the Meta interface seem to be a typical pain point for many advertisers, I wanted to share this resource with the digital advertising community. Cheers, and happy customizing!