In the ever-evolving world of digital marketing, tracking and measuring conversions is essential for understanding the effectiveness of your Google Ads campaigns. With Google’s newest version of their analytics product, GA4 (Google Analytics 4), marketers have a powerful tool at their disposal to monitor and optimize their ad campaigns.
In this blog post, we will explore the best and easiest ways to set up events and conversions in Google Analytics 4.
Setting Up Events in GA4
Events are user interactions with your website that you want to track, such as purchases, form submissions, video plays, click-on buttons, and more. GA4 makes it simple to set up and track these events by completing the following four steps:

- Access the GA4 Property: After creating your GA4 property for your website, navigate to the “Events” section in the left-hand menu.
- Define Your Events: Click on “Manage Events,” and then select “Create Event.” Name your event, and add relevant parameters. For instance, if you want to track clicks on your “Sign Up” button, you might name the event “Sign Up Button Click.”
- Configure Event Parameters: GA4 allows you to set parameters for each event, such as event name, event category, and event label. These parameters provide granularity to your tracking, enabling you to analyze user interactions in detail.
- Implement Event Code: GA4 provides an event code snippet that you or your developer can place on the relevant web page. This code captures the event and sends it to your GA4 property.
Example: Tracking Video Plays
Let’s say you want to track how many users are engaging with your marketing videos. Follow these three steps to track video plays in your GA4 campaign:
- Create the Event: Name the event “Video Play,” and set the category as “Video.”
- Implement the Code: Place the provided event code snippet on your video player’s play button.
- Analyze the Data: In GA4, navigate to the “Events” section to view the “Video Play” event. Analyze metrics like total plays, average engagement time, and conversion rate.
Tracking Conversions in GA4
Conversions represent specific actions you want users to take on your website, such as completing a purchase, signing up for a newsletter, or filling out a contact form. GA4 simplifies conversion tracking through its streamlined setup process with four steps.
- Set Up Conversion Events: Within the GA4 interface, go to the “Conversions” section, and click “Create Conversion Event.”
- Define Conversion Details: Name your conversion event, and select the appropriate parameters.
- Configure Trigger Conditions: Determine the conditions that trigger the conversion event.
- Implement the Event Code: Similar to events, GA4 provides a code snippet that needs to be placed on the specific page where the conversion occurs.
Example: Tracking E-commerce Purchases
Suppose you want to track the number and value of purchases made on your e-commerce website. Complete these four steps:
- Create the Conversion Event: Name the event “Purchase,” and define the currency as your local currency (e.g., USD). Set the value to be the total purchase amount.
- Set Trigger Conditions: The trigger condition for this conversion event is when users reach the “Order Confirmation” page.
- Add the Code: Place the provided conversion event code on the “Order Confirmation” page.
- Review Conversion Data: In the “Conversions” section of GA4, track the “Purchase” conversion event. Monitor metrics, such as the total number of purchases, revenue generated, and conversion rate.
(Note: Tracking purchases through GA4 can change depending on the setup of your website and checkout page. If you have trouble setting up ecommerce tracking directly in GA4, I would suggest using Google Tag Manager – check out our round-up of how to set up purchase conversions with reported revenue for the most common ecommerce platforms.)
GA4 Non-Ecommerce Conversion Tracking via Google Tag Manager
Another method for setting up GA4 events that we would recommend is implementing them through Google Tag Manager. This is a good approach if the forms you would like to track have a complicated trigger and don’t direct the user to a thank you page or if you have custom ecommerce tracking. In Google Tag Manager, you have more freedom to set up custom conversion triggers, so in certain cases, this would be a good route to take.
As an example, here is a step-by-step guide to creating a more complicated form-fill conversion in Google Tag Manager and linking it to GA4.
Step 1: Create a Conversion Event in GA4
- Log in to your Google Analytics account, and navigate to your GA4 property.
- In the left-hand menu, click on “Conversions.”
- Click on “Create Conversion Event.”
- Name your conversion event. An example could be “Form Submission.”
- Configure the details of the conversion event, including the conversion name, category, and any additional parameters you want to track.
Step 2: Set Up the Form Tracking in Google Tag Manager
- Log in to your Google Tag Manager account.
- Create a new tag:
- Click on “Tags” in the left-hand menu.
- Click “New” to create a new tag.
- Give the tag a name, such as “Form_Submission.”
- Choose the tag type “Google Analytics: GA4 Event.”
- Configure the tag:
- Choose your GA4 property in the “Configuration Tag” field.
- Name the event “Form_Submission” to match the conversion action you previously set up in GA4.
- Configure the trigger:
- Click on “Triggering.”
- Click “New” to create a new trigger.
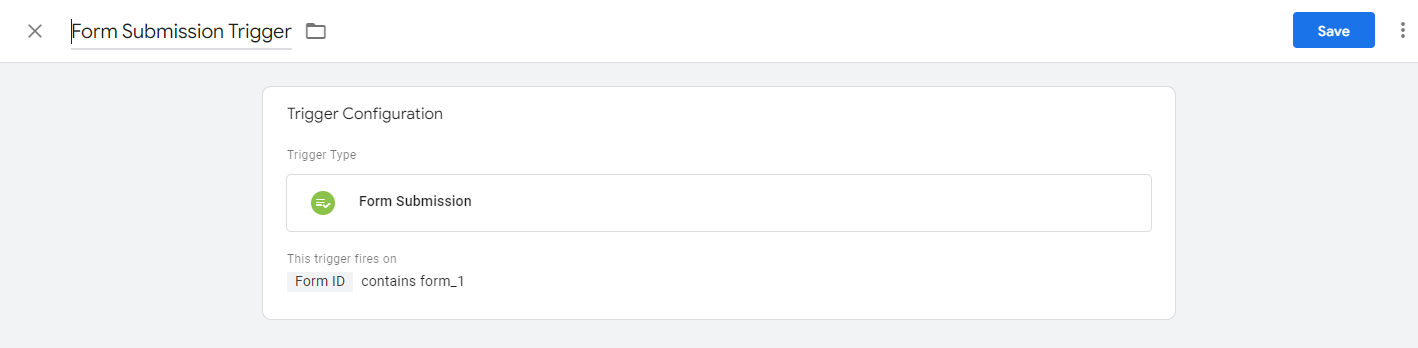
- Name the trigger. Give it a relevant name like “Form Submission Trigger.”
- Choose the trigger type based on your scenario. For this example, we are dealing with a form fill that does not lead to a thank you page, and instead, it fires a “Thank You” message after someone completes the form fill.
- Select a trigger type, such as “Element Visibility” or “Form Submission.” Both of these trigger types can be set to fire on specific variables that are unique to submitting the form.
- In this example, we used the Form Submission trigger type and located the form ID of the contact form to be “form_1.” See the image below.
- Save the trigger and tag configuration.
Step 3: Publish Changes in Google Tag Manager
- After configuring the tag and trigger, click “Save” at the top-right corner of the Google Tag Manager interface.
- Click “Submit” to publish the changes to your website.
Step 4: Test the Tracking
- In Google Tag Manager, select the “Preview” button, and enter your website URL where the form is located.
- Fill out the form, and submit it.
- After the submission, check on the debug view to see if your conversion action fired properly. If it doesn’t work, try a new variable that is specific to your form, and re-test the tracking.
Step 5: Verify Data in GA4
- In your GA4 property, navigate to the “Events” section to see the recorded form submission events.
- Note that this may take some time for the conversion data to be imported into GA4. Normally, initial changes could take up to 24 hours to appear in GA4.
- Check the conversion reports under the “Conversions” section to ensure that your form submission events are being recorded accurately.
Importing Conversions Into Google Ads
In certain, limited cases, GA4 may have more accurate conversion tracking than using Google Ads pixel tracking or you might want to track micro-conversions (actions that happen on the way to a larger, more important conversion), and you may want to import those conversions into your Google Ads account. There is an easy way to import the events you have marked as conversions in GA4 into your Google Ads campaigns. Here’s how:
- Ensure Proper Permissions: Make sure you have administrative access to both the Google Analytics 4 property and the Google Ads account you want to link.
- Link GA4 Property to Google Ads: To import conversions from GA4 to Google Ads, you need to link your GA4 property to your Google Ads account. Here’s how:
Google Ads Account:
- Sign in to your Google Ads account.
- Click on “Tools & Settings” (wrench icon) in the upper right corner.
- Under “Setup,” select “Linked accounts.”
- Select Google Analytics (GA4) & Firebase under “From Google,” and select “Manage & Link.”
- If your GA4 property is already linked, you’ll see it listed. If not, click the “+ Link property” button.
- If your GA4 account is not linked, select your GA4 property from the list.
- Click “Link.”
- Import Conversions:
- After linking the Google Ads account with the GA4 property, you will now have the ability to import any conversion goals into Google Ads.
- Note that in order for the conversion events to be importable, any events will need to be marked as conversions in GA4 prior to importing them.
- From the “Tools & Settings” icon, select “Conversions” under the Measurement section of the menu.
- From the conversions page, click “+New Conversion Action.”
- Select “Import.”
- Choose the option of Google Analytics 4 properties from this page, and from our examples, you will select the second option of “Web” rather than “App.”
- From there, you should be able to see all of the conversion actions you are able to import from GA4 into Google Ads. Select the conversions you will want to import over, and click on “Import and continue.”
- Adjust settings, such as conversion windows and attribution models, as needed.
- After linking the Google Ads account with the GA4 property, you will now have the ability to import any conversion goals into Google Ads.
- Monitor and Optimize: After importing conversions from GA4 to Google Ads, monitor the performance of your campaigns. You’ll be able to see the imported conversions in your Google Ads account’s reporting interface. Use this data to optimize your PPC campaigns, and adjust your strategies accordingly.
GA4 offers a user-friendly way to track Google Ads conversions, providing deeper insights into user behavior and campaign performance. By setting up events and conversion events, marketers can gain a clearer understanding of how their ads drive user actions, enabling them to optimize their strategies effectively. Implement these easy steps and examples to harness the power of GA4 for enhanced tracking and data-driven decision-making.