— John S.")
This is Part 2 of our three-part series on mastering product feed optimization in Google Merchant Center Next. In Part 1: Optimizing Google Shopping Listings with Supplemental Sources, we explored how supplemental data can enhance your listings and improve performance. In Part 3: The Impact of AI-Driven Feed Optimizations (and Why You Still Need to Be Proactive), we looked at how Google’s automation can support your feed strategy – and why manual oversight still matters.
Strategic Advantages of Using Supplemental Feeds
Supplemental feeds provide a powerful, flexible way to enrich your product data – and give you a real edge in today’s competitive Shopping landscape. Here’s how:
- More Complete Product Data: Supplemental feeds let you go beyond the required fields in your primary feed by adding optional attributes like material, pattern, size type, or product type. The more data Google has, the better it can understand and match your products to relevant searches.
- Improved Ad & Listing Relevance: By filling in missing attributes – like color or size – you increase the chances your product appears for specific queries (e.g., “red running shoes size 10”), leading to higher-quality traffic and better ad performance.
- Outperform Under-Optimized Competitors: Many merchants still rely on basic feed exports. A supplemental feed allows you to outclass their listings with more detail, improving your visibility and performance without raising bids.
- Easy Promo Management: For sales or seasonal events, supplemental feeds let you temporarily override fields like price or add custom labels (e.g., “Black Friday”). It’s a clean, reversible way to manage short-term changes without altering your main feed.
- Faster Bulk Edits: Updating hundreds of product titles, excluding products from free listings, or tagging items with custom labels is far easier through a supplemental feed, especially using a Google Sheet.
- Better Feed Organization: For complex catalogs or multiple markets, you can maintain separate supplemental feeds per region or product line, making data management simpler and more scalable.
Now let’s walk through the setup process. Setting up a supplemental feed in GMC Next involves two main stages: (1) Enabling the feature via Add-ons, and (2) Creating and linking the supplemental feed file. Here’s how to do it:
1. Open the Add-Ons Menu: In your Merchant Center Next account, click the Settings & Tools (gear) icon in the top-right corner. In the dropdown menu that appears, you’ll see a section called “Add-ons.” Select Add-ons. (This Add-ons section is new to GMC Next, and it’s where Google has placed certain advanced or optional features for you to activate as needed.)


2. Activate Advanced Data Source Management: In the Add-ons page, go to the Discover tab to find available add-ons. Locate the card for “Advanced data source management” – this is the add-on that unlocks supplemental feeds and feed rules. Click the Add or Activate button on that card. Once activated, this add-on will move to your “Active” add-ons tab. You have now enabled the ability to use supplemental feeds (and attribute rules) in your account.

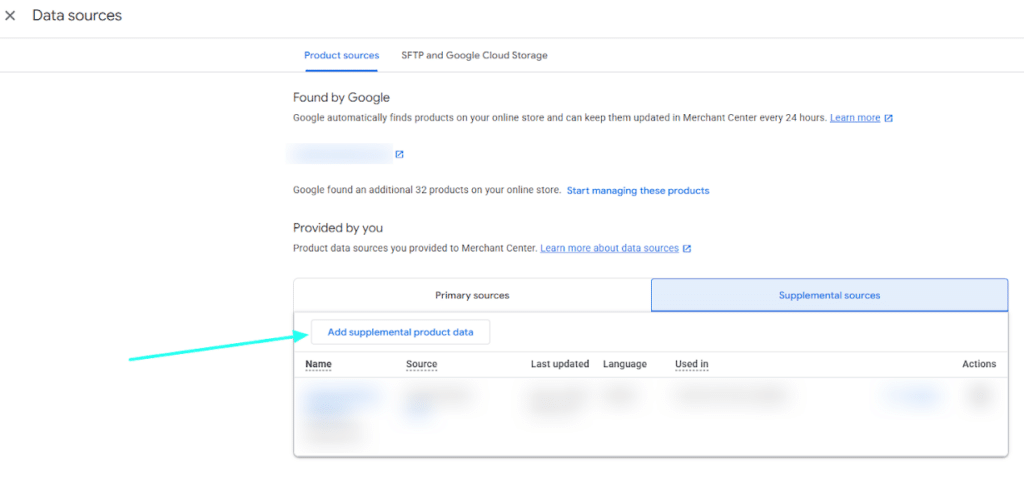
3. Navigate to Data Sources > Supplemental Sources: Now that the feature is on, you can add a supplemental feed. Still under the gear icon menu, go to Settings & Tools > Data sources. From the Data sources page, you should see a tab or section for Supplemental sources (in addition to your primary feed sources). Click on Supplemental sources. Then click the button to “Add supplemental product data” (or similar – the interface might say “Add product source” and then let you specify it’s supplemental).
4. Choose an Input Method and Provide the Feed File: Just like adding a primary feed, Merchant Center will ask how you want to submit your supplemental data. Common options include Add Product Data from a File, Use Google Sheets, and Add Product Data Using API. (A popular choice is Google Sheets for flexibility.) Select your preferred method, and follow the on-screen steps.
Pro Tip: If you’re using Google Sheets, download the template provided, and use that as a guide on how to set up the supplemental feed.
5. Name the Supplemental Feed & Link It to Primary Feed: Give your supplemental feed a clear name (e.g., “Company Name_Spring Sale Supplemental” or “Company Name_Feed Optimizations Sheet”) that helps you identify it later. You will also need to select which primary feed(s) this supplemental source will apply to. If you only have one primary feed, just select it and the corresponding target country/language of that feed. (Yes, supplemental feeds are linked to a specific primary feed and country target.) This linking ensures Google knows which base feed to enrich with your supplemental data.
6. Select Update Frequency: Choose how often Google should fetch the supplemental feed. You might set it to fetch daily, weekly, or just on demand. Google requires at least a monthly fetch, but in practice, a daily fetch is best and is the default setting. For a Google Sheet, you might just click “Fetch Now” whenever you’ve made changes, or schedule daily fetches during off-peak hours.
Pro Tip: Keep your supplemental feed updated in tandem with your primary feed. If a product is removed from the primary feed, any supplemental info for it becomes irrelevant; conversely, if you add new products, consider if they need to be added to the supplemental file as well.
7. Create the Supplemental Source: After filling in the details, click Continue, and select the feed label associated with your primary source, the default language, and the primary source that the supplemental feed will be adding data to. Select Create data source, which will finalize the supplemental feed.
Important Note: A supplemental feed must contain a column for ID that corresponds exactly to your primary feed’s IDs, and at least one other column for the attribute(s) you want to add or override. Google will match on the ID. For any given product ID, if the supplemental file provides a value for an attribute, it will apply that to your product data (overwriting the primary feed’s value for that field or adding it if the primary feed had none). For example, you could have a supplemental feed with two columns: “id” and “sale_price”. For the listed IDs, this will set a sale price without you touching the main feed. This makes supplemental feeds perfect for partial updates – you only include the fields that need tweaking. Google’s Content API documentation confirms that “partial updates with supplemental feeds let you make requests that only include the data that changed,” which is highly efficient for feed management.
Pro Tip: It’s best practice to keep your supplemental feed data as granular and specific as needed. You can use multiple supplemental feeds if it helps organize changes (for instance, one supplemental feed for promotional info and another for product detail enrichments). GMC Next supports multiple active supplemental sources, and they will all apply as long as they are linked to the primary feed. Just ensure they don’t conflict on the same attribute for the same product. If they do, the outcome can be unpredictable – usually, the most recently processed source wins for that data.
By mastering supplemental feeds in Google Merchant Center Next, you’re not just enhancing product data – you’re building a smarter, more adaptable foundation for your Shopping campaigns. Whether you’re improving listing accuracy, managing promotions with precision, or organizing data more effectively, supplemental feeds offer unmatched versatility.
As discussed in Part 1: Optimizing Google Shopping Listings with Supplemental Sources, leveraging these tools can significantly elevate your feed quality and campaign performance. And as Google continues to evolve its feed capabilities, staying proactive ensures your product data remains competitive and campaign-ready. Stay tuned for Part 3, where we’ll explore how AI-driven optimizations can complement your efforts and why your strategic input still plays a crucial role in long-term success.