Installing the Facebook Pixel can be overwhelming, but it is essential in order to correctly track Facebook Ads conversions, create custom audiences, and set up dynamic ads. Giving Facebook strong signals is imperative to your success, and installing the Facebook Pixel is the best way to do that.
There are three basic steps to installation: installing the base code, setting up events (either manually or using Facebook’s tool), and tweaking your settings. This can get a little difficult. If you’re not tech-savvy yourself, you might want to grab your developer to help.
1. Facebook Pixel Base Code

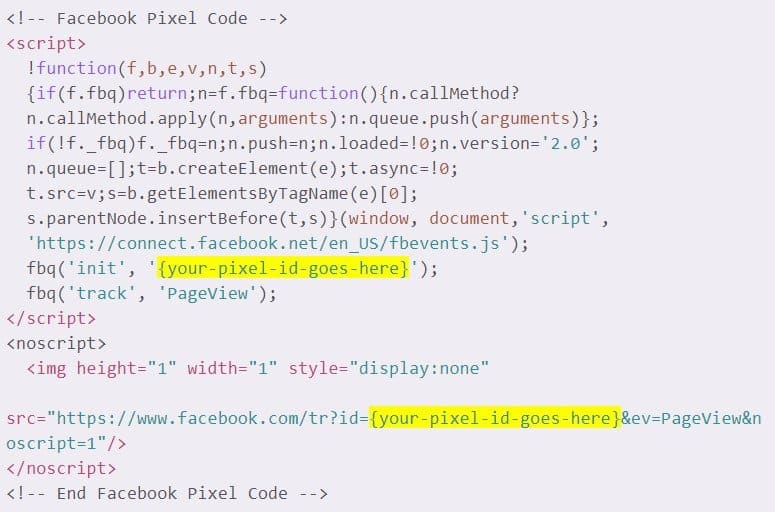
The first step is installing the base code, shown above, on every page of your website. The code is identical for all advertisers with the exception of the pixel ID, highlighted in yellow in the image above. This is what will be unique to your ad account.
If you use Google Tag Manager, Facebook makes it pretty easy to automatically add the Facebook Pixel Code. Just follow the step-by-step installation instructions on their developer site. If you don’t use Google Tag Manager, most websites have an easy way to add code to the header of a website so it appears on all pages. You copy and paste the base code from the installation instructions referenced above.
The next step is to install the tracking events into your base code. Events are the actions that customers take on your site that you want to track. There are two ways to install the events, and we’ll walk through both.
2a. Option 1: Manual Installation of Standard Events
Standard events track the conversions that are important to your business. You should install all microconversions related to your site in addition to your main conversion so you have all the events available for campaign optimization.
Facebook Ads offers the following tracking events:
- AddPaymentInfo: When payment information is added in the checkout flow. For example, when a person clicks on a save billing information button.
- AddToCart: When a product is added to the shopping cart.
- AddToWishlist: When a product is added to a wishlist.
- CompleteRegistration: When a registration form is completed, such as a subscription or signup form.
- Contact: When a person initiates contact with your business via telephone, SMS, email, chat, etc.
- CustomizeProduct: When a person customizes a product, such as selecting the color of a t-shirt.
- Donate: When a person donates funds to your organization or cause.
- FindLocation: When a person searches for a location of your store via a website or app, with an intention to visit the physical location.
- InitiateCheckout: When a person enters the checkout flow prior to completing the checkout flow.
- Lead: When a sign up is completed.
- PageView: This is the default pixel tracking page visits, such as when a person lands on your website pages.
- Purchase: When a purchase is made or checkout flow is completed, and the customer lands on thank you or confirmation page.
- Schedule: When a person books an appointment to visit one of your locations.
- Search: When a person searches for a product on your website.
- StartTrial: When a person starts a free trial of a product or service you offer.
- SubmitApplication: When a person applies for a product, service, or program you offer, such as applying for a credit card or job.
- Subscribe: When a person applies to a start a paid subscription for a product or service you offer.
- ViewContent: A visit to a web page you care about (for example, a product page or landing page). ViewContent tells you if someone visits a web page’s URL, but not what they see or do on that page.
Visit Facebook for Developers to see all of the object properties allowed for each event.
You’ll need your developer for the manual installation step to be sure the events trigger at the correct moments.
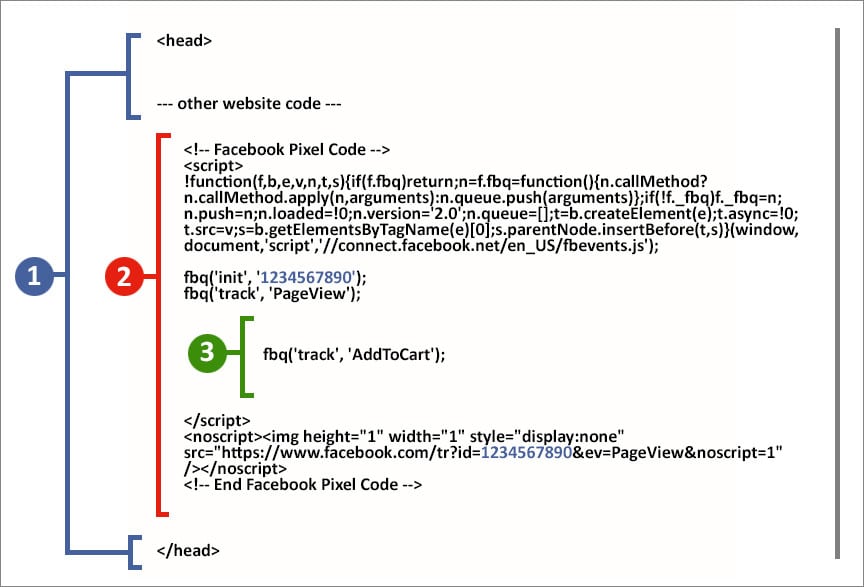
To install, use the fbq(‘track’) function within your base code after PageView. For example, the image below shows an example of the AddToCart event in the base code within the head of a web page.

Standard events also support parameter objects with specific object properties, which allow you to include detailed information about an event. They’re important to include where possible to assist with dynamic remarketing, audience building, and more. If you have an ecommerce site, make sure to include your revenue variable.
Facebook Ads offers the following parameter objects:
- content_category: Category of the page/product.
- content_ids: Product IDs associated with the event, such as SKUs (e.g. [‘ABC123’, ‘XYZ789’]).
- content_name: Name of the page/product.
- content_type: Either product or product_group based on the content_ids or contents being passed. If the IDs being passed in content_ids or contents parameter are IDs of products then the value should be product. If product group IDs are being passed, then the value should be product_group.
- contents: An array of JSON objects that contains the quantity and the International Article Number (EAN) when applicable, or other product or content identifier(s). id and quantity are the required fields. e.g. [{‘id’: ‘ABC123’, ‘quantity’: 2}, {‘id’: ‘XYZ789’, ‘quantity’: 2}].
- currency: The currency for the value specified.
- num_items: Used with InitiateCheckout event. The number of items when checkout was initiated.
- predicted_ltv: Predicted lifetime value of a subscriber as defined by the advertiser and expressed as an exact value.
- search_string: Used with the Search event. The string entered by the user for the search.
- status: Used with the CompleteRegistration event, to show the status of the registration.
- value: The value of a user performing this event to the business.
Visit Facebook for Developers to see the value types allowed for each property key.
2b. Option 2: Event Setup Tool
If you cannot install event code manually, Facebook offers an Event Setup Tool that doesn’t require any advanced coding – it handles the more complicated event setup through its step-by-step process. To take advantage of this tool, you still need to install your base code first (see instructions above).
To use the Event Setup Tool, sign into Facebook Business Manager and go to “Events Manager” and click on “Pixels.” Select your pixel, click “Settings” and go to “Event Setup Tool” under “Event Setup.” Enter your URL and click to “Open Website.” The tool will launch in your website browser. Facebook will typically provide some suggested events, but you can add events – such as “Track New Button” or “Track a URL” – that are not suggested by navigating to the webpages you want. Follow the onscreen instructions to complete the event setup. If you are tracking the “Purchase” event, make sure to set up value and currency parameters.
3. Pixel Events Manager Settings
Once you complete installation, make sure to check that your cookie and matching settings are enabled.
- First-Party Cookies: Allows you to share data from your website’s first-party cookies with Facebook. For optimal Facebook ads performance, be sure that cookies are set to “On.”
- Advanced Matching: Allows Facebook to see information customers have provided to your business, which helps you attribute more conversions and reach more people. Be sure that matching is also set to “On.”
Hopefully this simplifies the Facebook Pixel implementation process. The more technically advanced manual installation method can help you define many different events to create audiences, and refine and optimize your campaigns. But even if you don’t have access to a developer, you can still use Facebook’s Event Setup Tool. Either way, you’ll be giving Facebook as many signals as possible to help optimize your campaigns.


